 Sketchglass
How to set up your phone for AR tracing: stand, height and light
A steady phone, the right height and soft light make tracing feel easy. Here is how to get all three with things you already have at home.
In this guide
To set up your phone for AR tracing, stand it on something steady, like a drinking glass or a stack of books, about a hand above your paper with the camera looking straight down. Light the page evenly from the side opposite your drawing hand, tape the paper down, then place and lock the sketch on screen before you start drawing.
Most tracing problems are not drawing problems. A wobbly line, a sketch that seems to slide away, or a page that is hard to see usually comes from the setup: the phone moves, the light is in the wrong place or the paper shifts.
A solid setup takes a few minutes and costs nothing. This guide covers the three things that matter most: a steady stand, the right height and good light, then a full routine you can copy.
If you are brand new to the idea, start with what AR drawing is and how it works, then come back here to fine-tune.
Pick a steady stand
The phone has one job: stay perfectly still. If it moves even a little, the sketch on screen no longer lines up with the lines you have already drawn.
You do not need special gear. These all work:
- A drinking glass. Wide, heavy glasses are best. Lay the phone across the rim with the camera hanging over the paper. It is the classic setup and the one Sketchglass suggests.
- A stack of books. Two even stacks, one on each side of the paper, make a bridge for the phone. Books are steady and you can add or remove one to change the height.
- A phone stand or small tripod with a top-down arm. Handy if you trace a lot, but not needed to get started.
Give your stand a gentle nudge before you start. If the phone rocks, fix that first.
Place the stand on the side away from your drawing hand. If you draw with your right hand, keep the glass or books on the left, so your arm never bumps it.
Find the right height
Sketchglass recommends propping the phone about a hand above your paper. That is a good starting point, and here is why height matters:
- Too low and the camera only sees a small patch of paper, so you cannot fit a whole sketch on the page. Your hand also gets cramped under the phone.
- Too high and the paper looks small on screen, and tall stands wobble more.
Quick test: the area you want to draw on should fit on screen with a little space around it. Then hold your pencil as if drawing. If your knuckles touch the phone, go higher.
Keep the camera looking straight down. If the phone tilts, the sketch looks stretched and your drawing comes out lopsided. A quick check: the edges of your paper should look like a neat rectangle on screen, not a wedge.
Get the light right
The camera needs to see your paper and your pencil marks clearly.
- Use plenty of soft light. A room with daylight or a ceiling light plus a desk lamp works well. Dim rooms make the camera picture grainy, which hides faint pencil lines.
- Put the light on the side away from your drawing hand. If you draw with your right hand, light from the left. That way your hand does not throw a shadow over the spot you are drawing.
- Watch for the phone's own shadow. The phone sits right above the page, so a single lamp directly overhead can cast a dark phone-shaped patch. Move the lamp to the side until the patch fades.
- Avoid glare. Shiny paper and bright lamps can create a white hot spot on screen. Matte paper and a lamp at a lower angle fix most glare.
- Use the flashlight if you need it. Sketchglass has a flashlight button in the tracing view. It switches on your phone's camera light to brighten the page. Some cameras have no flashlight, and the app tells you if yours does not.
Set up the page
A steady phone does not help if the paper slides. Before you trace:
- Tape the corners. A small piece of masking tape on two or four corners keeps the sheet in place. Masking tape peels off without tearing most paper.
- Use a clear, flat table with nothing you might knock.
- Pick plain paper. Plain white or light paper shows the sketch on screen most clearly. Darker paper works too, but you may need to change the line colour.
Drawing with a child? Sit with them for the first setup and keep the space clear. Our parent's guide to AR drawing has more on a safe drawing spot and camera privacy.
Your full setup, step by step
Here is the whole routine in order.
- Clear the table and check the light comes from the side away from your drawing hand.
- Tape your paper down on two or four corners.
- Build your stand (glass, books or box) on the side away from your drawing hand.
- Lay the phone on top, camera facing down and centred over the paper, about a hand above it.
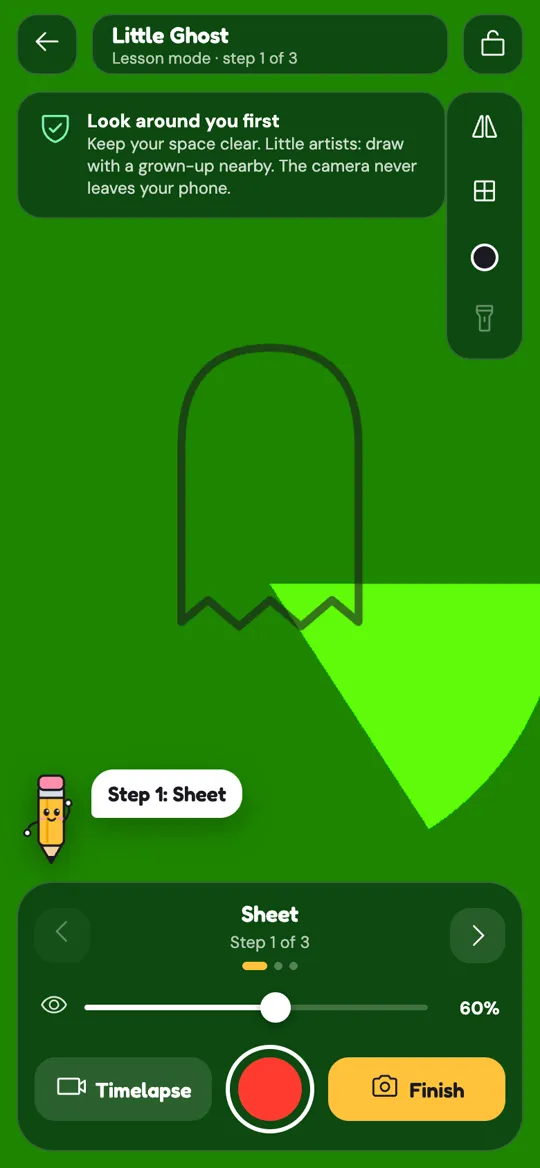
- Open a sketch. It floats over your paper on screen.
- Place it. Pinch to resize, drag to move and twist to rotate until it sits where you want it.
- Lock it. Tap the padlock at the top so a stray touch cannot move the sketch.
- Adjust the tools. Turn on the grid if you like guide lines, change the line colour so it stands out against your paper, and set the opacity slider so you can see both the sketch and your own pencil marks.
- Trace one step at a time, looking through the screen as you draw.
The opacity slider starts at 60%. Turn it down when the sketch hides your own lines, and up when the sketch is hard to see in bright light.
Quick fixes for common setup problems
- The sketch slides away from my lines. The phone or the paper moved. Check the stand is steady and the paper is taped, then unlock, line the sketch up with what you have drawn and lock it again.
- The sketch looks stretched. The phone is tilted. Make the stand level so the camera looks straight down.
- I cannot see my pencil marks. Press a bit harder, turn the opacity down, or add light from the side.
- My hand keeps bumping the phone. Raise the phone by one book or move the stand further from your drawing hand.
- The picture is dark or grainy. Add a lamp or switch on the flashlight.
When you are done
When you finish, tap Finish to snap a photo of your paper. Keep the same steady setup and light: a sharp, evenly lit photo makes your card look its best.

You get your stars and a Sketchdex card, and you can bring the drawing to life. To learn what the stars mean, read our guide to Sketchdex card stars and rarities. Looking for a first sketch to try with your new setup? The cute baby T-Rex guide is a friendly place to start.
FAQ
How high should my phone be for AR tracing?
Start with the phone about a hand above your paper, camera facing straight down. Raise it if you want to draw bigger or your hand bumps the phone, and lower it for small drawings so you get a closer view.
What can I use as a phone stand for tracing?
A wide drinking glass, two stacks of books, a box or a tripod with a top-down arm all work. The most important thing is that the phone does not rock or move while you draw.
Why does my traced drawing come out stretched?
The phone is probably tilted, so the camera sees the paper at an angle. Level the stand until the edges of your paper look like a neat rectangle on screen.
Where should the lamp go when I trace with my phone?
Put the light on the side away from your drawing hand, so your hand does not shadow your lines. Move it to the side if the phone casts a shadow on the page.
Does Sketchglass have a flashlight?
Yes. The tracing view has a flashlight button that switches on your phone's camera light. If your camera has no flashlight, the app shows a short message instead.
Should I tape my paper down?
Yes, if you can. A little masking tape on the corners stops the paper sliding, which keeps your drawing lined up with the sketch on screen.