 Sketchglass
AR drawing app tools explained: grid, flip, line colour, opacity, flashlight and timelapse
Six small buttons sit around the tracing screen. Here is what each one does in Sketchglass, when it helps and when to leave it alone.
In this guide
Sketchglass has six tracing tools. Flip mirrors the sketch, the grid lays guide lines over the camera view, line colour switches the guide between black, red, blue and green, and the opacity slider fades the guide from 10 to 100 percent. The flashlight turns on the phone's camera light, and the timelapse recorder films your paper while you draw. Set flip, colour and opacity before you lock the sketch, then leave them alone.
Open a sketch in a tracing app and the camera view fills up with little icons. Most people ignore them, trace the picture and never find out that one tap could have made the lines easier to see.
This guide walks through the AR drawing app tools in Sketchglass one by one: what each button does, when it helps and when it gets in the way. New to camera tracing? Start with what AR drawing is and come back.
Where the tools are on the tracing screen
Everything lives on one screen, around the edges of the camera view.
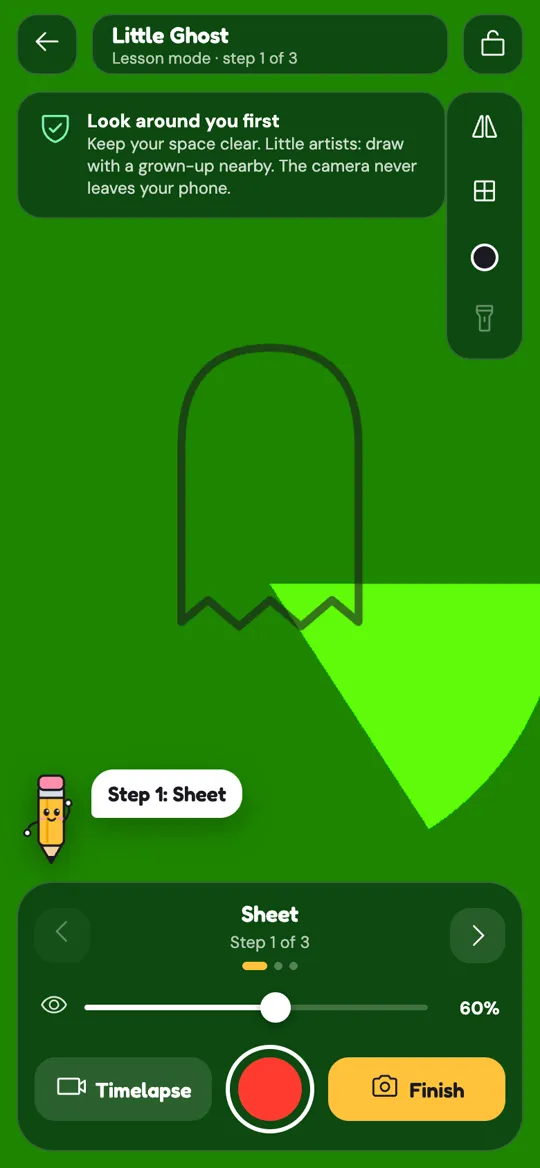
- Top right: the padlock, which locks the sketch in place.
- Right-hand rail, top to bottom: flip, grid, line colour, flashlight.
- Bottom panel: the opacity slider with an eye icon, then Timelapse, the round record button and Finish.
When flip, grid or the flashlight is switched on, its button turns white, so you can tell at a glance what is active.
Flip: mirror the sketch
Flip turns the sketch into its mirror image, left to right. Tap once to mirror it, tap again to turn it back.
Good reasons to use it:
- Facing the other way. A dinosaur that looks left can look right instead. Handy when you want two characters facing each other on one page.
- Fitting the page. If a tail or an arm points at the edge of your paper, the mirrored version may fit the space better.
Two things to remember. Decide on flip before your first line, because flipping halfway leaves you with half a drawing that no longer matches. And flip never carries over: each time you open a sketch, it starts the normal way round.
Be careful with lettering. A flipped name reads backwards, which is only useful if that is the joke.
Grid: straight lines over the camera view
The grid button lays a faint white grid over the whole camera view, six boxes across and ten down. It belongs to the screen, not to the sketch, so it stays still when you drag or resize the picture.
That makes it a ruler for your setup:
- Straighten the paper. Slide the sheet until its edge runs along a grid line. A straight page gives you a straight drawing.
- Centre the sketch. Count boxes on each side so the picture sits in the middle of the sheet, not squeezed into a corner.
- Check your stand. If the paper edges lean in towards each other on screen, the phone is tilted. Level it until the edges follow the grid.
Once the sketch is placed and locked, most people turn the grid off again so there are fewer lines to look at. A slipping setup is a different problem, and why your AR trace drifts covers how to fix that.
Line colour: make the guide stand out
The round button in the rail shows the current guide colour. Each tap moves to the next one: black, red, blue, green, then back to black.
Pick the colour that looks least like your pencil and your paper:
- Black is clear on white paper, but it can hide your own pencil marks underneath.
- Red or blue on white paper lets you see exactly which lines are the guide and which are yours.
- A bright colour helps on tinted, brown or grey paper where a dark guide gets lost.
The app remembers your choice, so the next sketch opens in the same colour. It changes the built-in sketches and name lettering. A photo you have turned into line art keeps its own pencil look.
Opacity: how strong the guide looks
The slider with the eye icon fades the sketch. It starts at 60 percent every time and runs from 10 percent, a ghost of a line, up to 100 percent, fully solid.
- Go higher when the room is bright, the paper is dark or you are placing the sketch and need to see it clearly.
- Go lower once you have a few lines down, so your pencil marks show through the guide.
- Go very low as a challenge. With the guide barely there, you start trusting your own hand. That is the first step in going from tracing to freehand.
Unlike flip, opacity is safe to change at any moment, even when the sketch is locked.
Flashlight: more light on the paper
The flashlight button switches on the phone's camera light, which points down at your paper. Tap again to turn it off.
It helps in a dim room or when your hand throws a shadow over the page. It helps less on shiny paper, where the light can bounce back as a bright spot. If that happens, turn it off and move a lamp to the side instead. Our guide to setting up your phone for AR tracing has more on good light.
If the button looks greyed out, the camera in use has no light. Tapping it shows the message "No flashlight on this camera".
Timelapse: film your drawing as it appears
The timelapse recorder makes a sped-up video of your drawing session.
- Tap Timelapse or the round red button next to it. Pip says "Recording your timelapse!" and a small timer appears near the top of the screen.
- Draw as usual. The app saves a picture of the camera view about twice a second.
- Tap the button again to stop, or simply tap Finish. Finishing stops the recording for you.
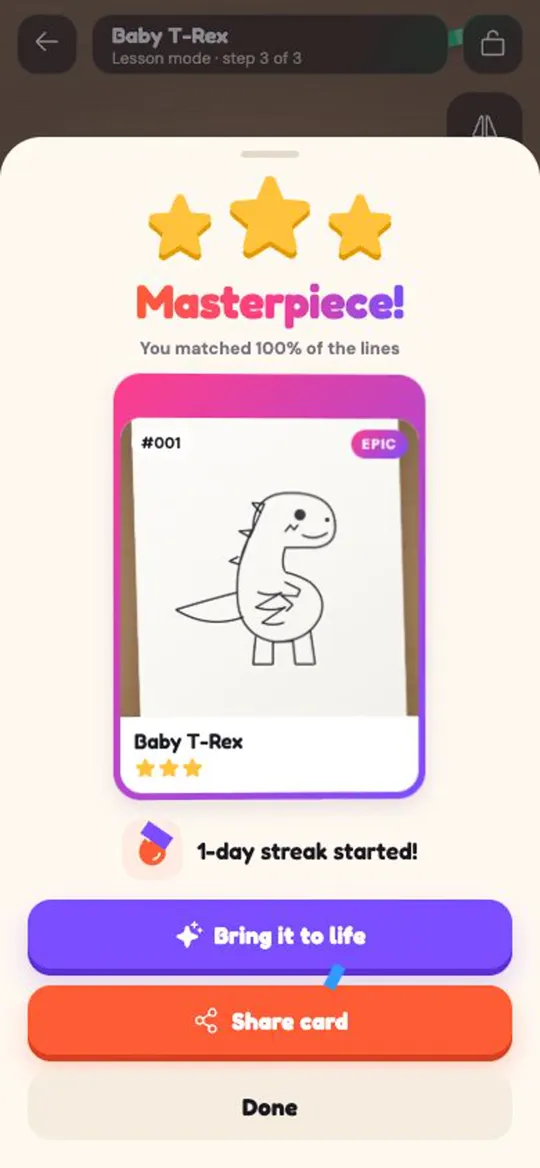
- On the result sheet, tap Save timelapse. The button only shows up when you recorded something.
Good to know:
- The video shows the camera view only: your paper, your hand and your pencil. The guide sketch and the buttons are left out, and a small Sketchglass name sits in the corner.
- Save it from the result sheet before you tap Done. Leaving the tracing screen clears the recording, and so does tapping the back arrow mid-drawing.
The best order to set everything
Each tool is simple. Using them in a sensible order is what makes a session smooth.
- Prop the phone and open the sketch. Turn on the flashlight if the room is dim.
- Turn on the grid. Straighten the paper and level the phone.
- Flip now, if you want the mirror image.
- Pinch, drag and twist the sketch into place. Raise the opacity if it is hard to see.
- Pick a line colour that stands out from your paper and pencil.
- Tap the padlock. You should see "Locked in place".
- Turn the grid off and start the timelapse if you want one.
- Trace. Lower the opacity as your own lines build up.
- Tap Finish and save your timelapse from the result sheet.
FAQ
What does the opacity slider do in an AR drawing app?
It changes how strong the guide sketch looks over the camera view. In Sketchglass it starts at 60 percent and goes from 10 to 100 percent. Turn it up to place the sketch, and down so your own pencil lines show through.
Does the grid appear on my finished drawing?
No. The grid is only drawn on the screen to help you straighten the paper and centre the sketch. It is not part of the sketch, your card or the timelapse video.
Can I change the line colour while I am tracing?
Yes. Tap the round colour button to move through black, red, blue and green. It is safe to change at any time, even when the sketch is locked, and the app remembers your pick for next time.
Why is the flashlight button greyed out?
The camera the app is using has no light it can switch on. Tapping the button shows "No flashlight on this camera". Use a desk lamp placed to one side of the paper instead.
Does the timelapse show the sketch I am tracing?
No. The recording shows the camera view only, so viewers see your paper, your hand and the drawing appearing. The guide and the on-screen buttons are left out.
Is the timelapse video uploaded anywhere?
No. Sketchglass has no account and no server. The video is made on your phone, and it only leaves the phone if you choose to share it yourself.