 Sketchglass
Paper and pencils for AR tracing: a simple kit that works
You do not need special art supplies to trace with your phone. Here is what to put on the table, what to skip and how to test your kit in five minutes.

In this guide
For AR tracing, plain, smooth, light-coloured paper works well, and ordinary printer paper is fine to start. Use a light pencil such as an HB for the first lines so mistakes erase cleanly, then go over the final lines with a softer, darker pencil like a 2B or a fine pen. Add masking tape to hold the sheet still and a soft eraser. Nothing else is required.
New tracers often ask what to buy. The honest answer is: probably nothing. Most homes already have what you need, but a few small choices make lines easier to see on screen, easier to fix and nicer when you finish.
This guide to paper and pencils for AR tracing covers the sheet, the pencils, a few extras and a quick test to run before your first real drawing.
Why your supplies matter more with a phone
When you trace with a phone, you are not looking at the paper directly. You are looking at the paper through the camera, with a sketch floating on top. Three things need to be easy to see at the same time:
- The sketch on the screen.
- Your pencil lines on the paper, as the camera sees them.
- The tip of your pencil, so you know where you are.
Dark, shiny or busy paper makes this harder. A faint pencil can vanish on screen, and a dark one used too early makes mistakes hard to erase. The right kit keeps all three easy to see.
Choosing the paper
Start with what you have, then adjust.
- Use plain paper, without lines or a pattern. Lined notebook paper adds extra stripes on screen that compete with the sketch. A blank sheet keeps the view clean.
- Pick a light colour. White or cream is the easy choice, because dark pencil shows clearly against it. Pale coloured paper works too, as long as your lines still stand out.
- Prefer a smooth, matte surface. Glossy paper can bounce light into the camera and create bright patches. Very rough paper makes small lines wobble. Ordinary printer paper or a sketchbook page sits nicely in between.
- Go a little thicker if you erase a lot. Thin paper can crinkle, tear or show the marks from the other side. Drawing paper or a sketchbook page holds up better to rubbing out and going over lines twice.
- Choose a size that fits the camera view. You will pinch the sketch to the size you want, so the whole drawing should sit on the sheet with a little space around it. A standard sheet of printer paper is a comfortable size for most sketches.
If you are deciding between loose sheets and a bound sketchbook, loose sheets are easier to tape flat. A sketchbook keeps all your drawings together, but its pages can curl or bounce near the spine, so press it open and tape the edges.
When the paper and the sketch clash
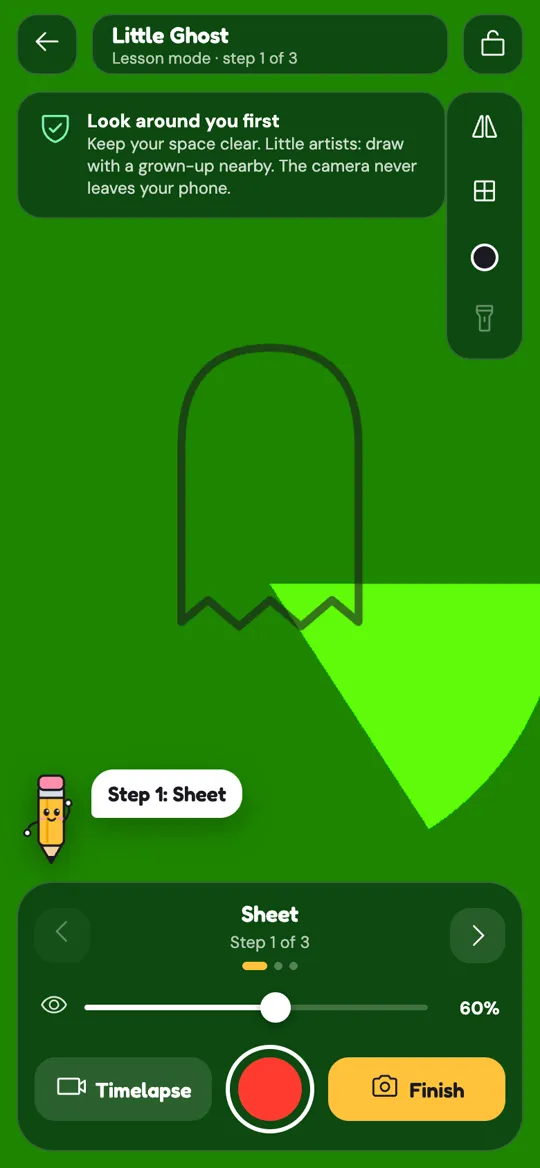
Sometimes the sketch is hard to see against your paper. In Sketchglass you can fix that without changing paper. Tap the line colour button on the right of the tracing view to switch between dark, red, blue and green lines, and pick whichever stands out most. The opacity slider at the bottom lets you make the sketch stronger or fainter. We cover both in more detail in our guide to the tracing tools.
Choosing your pencils
You only need two pencils, and you may already own both.
Pencils are graded by how hard or soft the lead is. H pencils are harder and make lighter, thinner lines. B pencils are softer and make darker lines that smudge more easily. HB sits in the middle, and it is the ordinary school pencil most people have.
Here is a simple way to use them:
- Trace the whole sketch lightly with an HB. Press gently. These first lines are a guide, and light lines are easy to erase if the sketch slips or your hand wanders.
- Check the drawing without the phone. Lift your head and look at the paper itself. Fix anything that looks off before you go darker.
- Go over the lines you want to keep with a 2B. A softer pencil gives a darker, bolder line that shows up well on screen and in a photo of your finished work.
- Erase any leftover guide lines. Wait until the dark lines are done, then tidy up gently.
Only one pencil? Use light pressure first and heavier pressure at the end. Pressure does much of the same job.
Pens and markers for a clean finish
Once the pencil drawing looks right, you can go over it with a fine black pen or marker for a bold, clean outline. Let the ink dry fully before you erase the pencil underneath, or it will smear. Test the pen on the corner of the sheet first, because some markers bleed through thin paper.
The small extras that help most
These are cheap, and each one solves a real problem.
- Masking tape. Tape two or four corners of the sheet to the table. A sliding sheet is the most common reason a trace stops lining up, as we explain in why your AR trace drifts.
- A soft eraser. A separate block eraser is gentler on paper than the small one on the end of a pencil.
- A steady stand. A wide glass or two stacks of books. The full setup, with height and light, is in our guide to setting up your phone for AR tracing.
- A sheet of scrap paper under your hand. It stops the side of your hand smudging soft pencil lines as you work across the page.
Test your kit in five minutes
Before a big drawing, run a short test. It tells you more than any shopping list.
- Set up the phone and tape a sheet down. Use the paper you plan to draw on.
- Draw three short lines in a corner: one light HB line, one pressed-harder HB line and one 2B line.
- Look at them through the camera. Can you see all three clearly with the sketch on top? If the light line disappears, press a little harder or turn the opacity down.
- Erase the first line. If it leaves a dark ghost or roughs up the paper, start lighter next time or try thicker paper.
- Check for glare. If a bright patch hides part of the sheet, move the lamp to the side or tilt the paper slightly away from the window.
If everything looks clear, you are ready. If the room is dim, the flashlight button in the tracing view can light the paper on phones whose camera has a light.
What you can skip
You do not need tracing paper, a light box or special AR paper to trace with a phone. The camera does the job that a light box does. If you are curious about how these methods compare, read AR tracing vs a light box vs tracing paper.
Two pencil grades are plenty for tracing. Softer pencils become useful once you add tone, as our shading basics for beginners shows.
FAQ
What paper is best for AR tracing?
Plain, smooth, light-coloured paper without lines works well. Ordinary printer paper is fine for practice. If you erase a lot or go over lines with a pen, a thicker sketchbook or drawing paper holds up better.
Which pencil should I use for tracing?
Use a light pencil such as an HB for the first lines, pressing gently so they erase easily. Then go over the lines you want to keep with a softer, darker pencil such as a 2B, or a fine black pen.
Can I trace on coloured paper?
Yes, as long as your lines and the sketch both stay easy to see. Pale colours are easiest. In Sketchglass you can switch the line colour and adjust the opacity so the sketch stands out against your paper.
Do I need tracing paper or a light box for AR drawing?
No. The phone camera shows the sketch on top of your real paper, so you draw straight onto the sheet you want to keep. Tracing paper and light boxes are different methods.
Why is my paper sliding while I trace?
Loose sheets slide under a drawing hand, especially when you erase. Tape two or four corners to the table with masking tape and hold the paper down with your free hand while you rub out.
Can I use a sketchbook instead of loose paper?
Yes. Press the book open flat and tape the page edges if they lift, because a curled page can look bent on camera and make the sketch harder to line up.